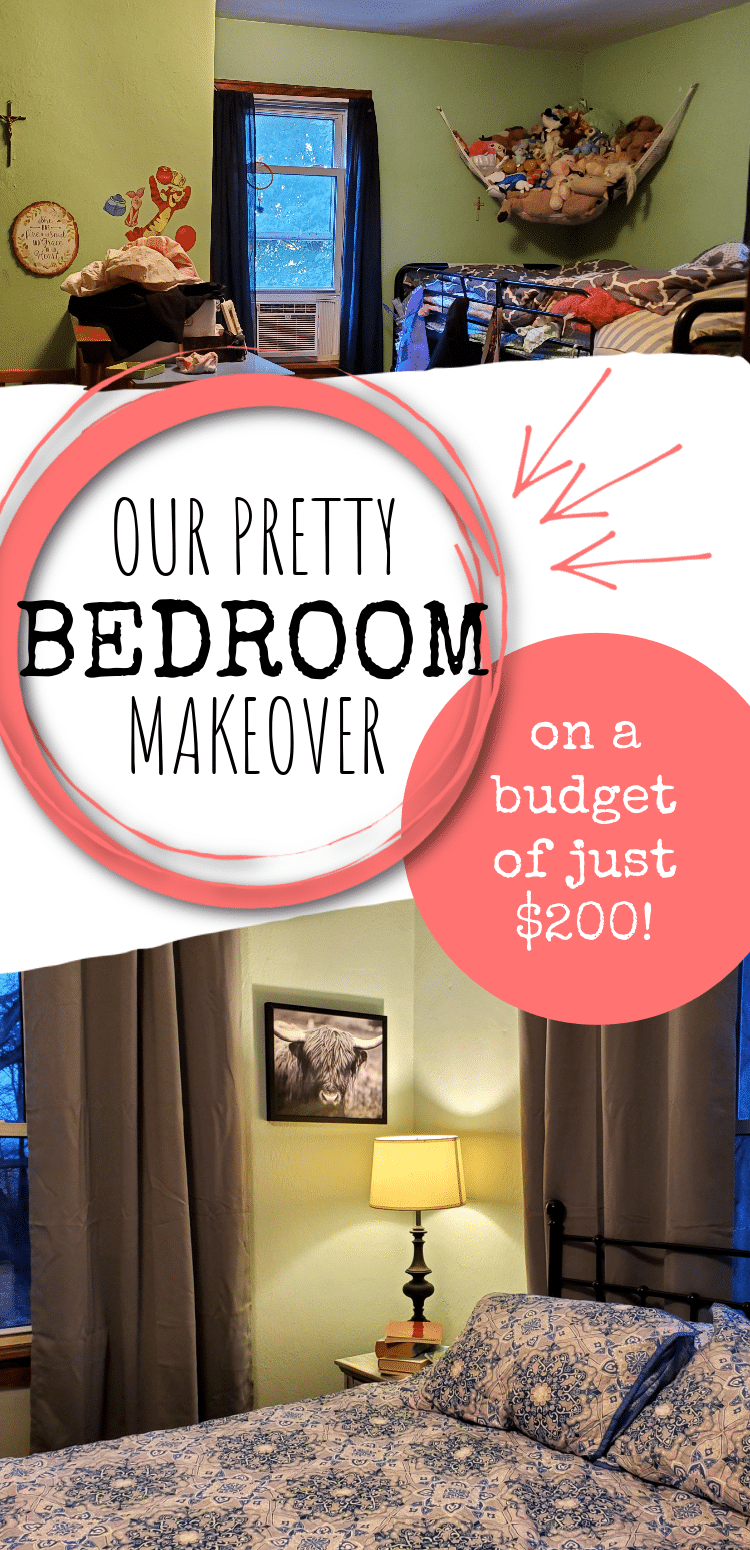
This bedroom makeover on a budget from a few simple changes and $200 turned out beautifully! See the before and after photos here.
For most of our adult lives, the bedroom my Hubby and I shared has not been what you’d consider a “master bedroom”.
Really, it was like the bedroom version of a junk drawer.
“Honey, where’s this go?” “I don’t know, put it in our bedroom.” (repeat for years on end)
That’s no way to live. Especially in the room that should be your quiet escape from your 6 kids. 😉
So when we went through our big house project last year, I knew that creating a nice bedroom for us needed to be a priority.
By the time I finished up our budget bedroom makeover, even my Hubby (who doesn’t care about any of the decision making stuff) was impressed.
Check Our Our Bedroom Makeover On A Budget
The change in bedrooms was even more dramatic for us, because we ended up trading rooms with our daughters.
That’s because the home addition we put on meant that our new second bathroom would come off of their bedroom in the back.
This budget doesn’t include any of the addition costs. But the changes I’m talking about today can be done in any bedroom.
The Bedroom Befores
Bedroom Number One
So here’s what our old bedroom looked like. (If I’m being honest, this is cleaner than usual. sigh)

Notice the “rustic” paint style. The eclectic “throw-it-wherever” look. Wall hangings placed where the previous owners had left nails.
Very well thought out.
/sarcasm
This is the room we gave to our daughters. Here’s what we turned that room into:

The cost of the girls bedroom was very little.
My neighbors happened to ask me if I wanted a set of bunk beds just days before I had planned on going to Ikea to look at their bunk beds! (Score! My neighbors rock.)
It did cost me 2 gallons of paint. My 11 year old wanted the whole room that dark turquoise color, but I convinced her to limit that to one wall.

Bedroom Number 2: The New Master Bedroom
Meanwhile, here’s a before shot of what would become our new bedroom:

This room would be a nice, big room if it weren’t for the 6 foot pantry cutting into the room.
Here’s what that corner looks like from another angle (after we had switched rooms):

Now, getting rid of that pantry was part of the home addition plan, so here’s what that turned into:

We lived in our bedroom like this for a couple of months. (In the meantime, we did eventually get drywall here and the bathroom was completed!)

In the meantime, I picked up the book Cozy Minimalist Home. I thought it would help me to keep the house from getting to be such a mess.
And sure, it helps with that. BUT, I had NO idea that this book is a crash course in decorating for people who are decorating challenged (like me)!
(I borrowed the ebook from the library. But I suggest you try to get your hands on a hard copy, library or bought, so you can see in color her many pictures that really explain her methods.)
Based on her suggestions, this is what I did next…
Our Budget Bedroom Makeover Process
First, I started to look at pictures of master bedrooms that caught my eye. I checked Pinterest and Google photos the most.
After a while, I noticed some patterns. (I also asked some friends to look over my collection to see if they noticed anything I had missed.)
For instance, I could tell right away that I really liked metal beds.
My friend said I seem to like natural textures, classic styles, and no clutter.
ha! Boy am I TIRED of clutter! But that’s a whole ‘nother topic.
Paint
Guys, I really wanted to like the paint called Sea Salt from Sherwin Williams. It seems so pretty online!
But when I tried the sample out in different parts of my room, it just looked like a khaki green color.
Maybe that’s because it’s a northern facing, darker room.
Luckily, my second choice turned out to be lovely. Even now, when I wake up and see the soft blue color it just makes me happy.
I went with Woodlawn Blue from Benjamin Moore.

The Bed and Area Rug
Next, I was excited to do some shopping around for metal beds.
I found these on Amazon:
Some were more affordable than others, and I had a gift card I could use to pay for part of it. But spending $200 on the bed alone just didn’t sit right with me.
So I slept on it. (haha, irony)
Then I remembered a local bidding website that my family loves to use. And I thought maybe I’d have some luck there.
Boy, did I ever!
I found a queen sized metal bed there for a fraction of the price. (Scroll to the bottom for the price breakdown.)

While I was bidding, I also found a rug that I really liked.

Night Stands
Another place that I felt a little hung up was in choosing night stands.
Even the cost of used furniture is crazy right now! I really loved the idea of having 3 drawer dressers like you see in many farmhouse style bedrooms.
(Mainly because it would be a good place to hide some clutter, but also the look is so nice.)
But the price…yikes. Even used dressers on Marketplace are going for $100 each!
Just as I was about to give up (sensing a theme yet?), I opened Facebook Marketplace one more time to find that someone had just listed two end tables…the cost was $20 for both!
I jumped on it. By the next morning, they were riding home in my minivan.
Now, I’m no DIYer, but I figured I could do something with them.
Unfortunately, I don’t have a good “before” shot of the night stands. But I did crop this from the original listing. (haha!)

I did a crappy job of repairing the bottom where it was coming loose, but it worked well enough.
Then I tried my hand at this technique for gray washing furniture. Since I used leftover paint from the girls’ bedroom and supplies I already had on hand (including new pulls), this makeover cost me nothing! My favorite price!
This is the end result. Not perfect, but good enough for us!

Finding Lamps and Lamp Shades
On the way home from snagging my night stand deal, we stopped by our St. Vincent de Paul thrift shop. As luck would have it, I found two lamps that were matching enough to make me happy.
I did not, however, find lamp shades. That took a second trip to St. Vincent de Paul about a week later.
Funny, I had never shopped there before. (I usually hit Goodwill instead.) But now I’m a believer.
Both lamps work great and just needed a little cleaning.
Curtains and Rods
I found my curtain rods on the auction site for just a couple of dollars.
They don’t match exactly, but that’s ok. If I see another matching rod come up for auction, I’ll try to grab it for a couple of bucks. If not, I won’t be losing sleep over it.
And the gray curtains were from Amazon. I used a combination of rewards points on my credit card from Christmas purchases and gift cards I had redeemed from Fetch Rewards.
Fetch is a free app that gives you things like Amazon gift cards for uploading your receipts. I love it! Click this link, use referral code PEWR4, and you can start with 2,000 points right off the bat!
Cow Picture
This is where I let myself splurge a little.
I was shopping at Walmart, and this cow picture practically jumped off of the shelf at me.

He’s gorgeous!
(Hey, I had a thing for cows waaay before they became popular…)
BUT…he was also $30.
I really struggled over whether I should splurge that kind of money after having saved so much on the rest of the room.
But ultimately, I knew he would make me so happy. He fit so perfectly on the wall. And I’m glad I spent the money.
Get your own cow picture here. You know you want him, too!
The Total Cost Breakdown of Our Master Bedroom Makeover On A Budget
I know it’s easy to read a post like this and think “Sure, that’s great that you had access to things like an auction site and free points on a credit card, but how does that help me??”
But I want you to notice a couple of patterns I used…
- I waited. More often than not, “sleeping on it” ended up saving me a ton of money.
- I asked around. Friends and family introduced me to that auction site. I wouldn’t have known about it if I didn’t ask!
- I planned ahead. I’m not a fan of using credit cards, but if I’m going to use them online, I might as well choose one that gives me rewards. Also, racking up points on apps like Fetch pays off in the long run!
Here’s what we ended up with:

- Paint: $50.15
- Bed: $51.20
- Rug: $23.50
- Night stands: $20
- Lamps: $12
- Lamp shades: $8
- Curtain rods: $5
- Curtains: free
- Highland cow print: $29.97
- Total Bedroom Makeover Cost: $199.82
That’s how I made over our bedroom for under $200.
I don’t know if I could come in at $199 again if I tried!
So there’s our real life bedroom. It doesn’t look like a magazine, but we are so happy with it!

Did you already have your bedspread & pillow shams? I didn’t see that in your price list.
I did! They were a Christmas gift, so they’re still pretty new, too. 🙂